

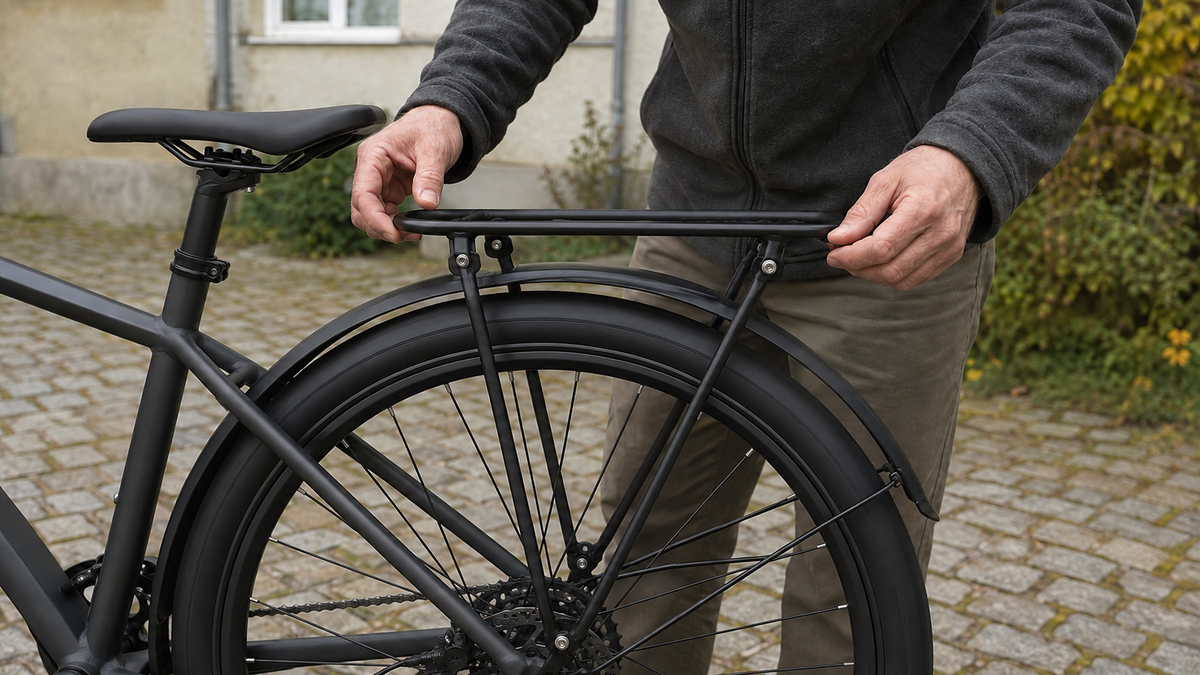
If the bicycle luggage rack wobbles, remove the luggage first. A loose frame can shift the load, rub against the tire, or damage mounting points. The problem is not always caused by a single loose screw: struts, eyelets, adapters, threads, or the rack itself may be affected. A systematic inspection of the unloaded, stationary bicycle can determine whether simple model-specific fastening is sufficient or whether a specialist workshop must take over.
Unload immediately and stop safely
If you feel movement, rattling, or contact with the wheel while riding, stop in a controlled manner. Remove bags, the basket, and loose straps. Check whether the rack, its struts, or cables have moved toward the tire, spokes, brake, or chain. Do not continue riding if there is contact, a crack, visibly deformed metal, or a torn-out mounting point.
In Germany, securing a load is not merely a matter of comfort. Under Section 22 of the German Road Traffic Regulations (StVO), loads and load-securing equipment must be stowed and secured so that they do not shift, topple, fall off, or create avoidable noise, even under emergency braking or evasive maneuvers. Section 23 of the StVO makes drivers responsible for ensuring that road safety is not impaired by the load or the vehicle's condition.
Where exactly does the luggage rack move?
| Inspection point | Typical observation | Consequence |
|---|---|---|
| Entire rack moves sideways | Play may be present at lower eyelets or upper struts | Inspect all mounting points together |
| Only the rack platform or one tube flexes | Component deformation or crack possible | Do not load; have the rack inspected |
| Rattling without perceptible rack play | Spring flap, light, mudguard, adapter, or bag possible | Remove accessories individually and compare |
| Screw turns but does not tighten | Thread, nut, or insert may be damaged | Do not tighten further; specialist workshop |
| Rack is misaligned with the wheel | Strut bent, incorrect spacing, or installation error possible | Do not load; have clearance checked |
| Movement at the frame mounting point | Eyelet, adapter, or frame affected | End the ride; manufacturer/specialist workshop |
Grip the unloaded rack platform with both hands and move it only slightly left, right, up, and down. Observe each connection point as you do so. Strong levering movements distort the inspection and can place stress on thin struts. A second look from behind shows whether the rack is centered over the wheel.
Inspect the lower and upper mounting separately
Classic rear racks are often attached at the bottom to frame eyelets and at the top via one or two struts. Other systems use axle adapters, special clamps, or integrated frame mounts. Check that all specified mounting points are present, that the screw heads sit flush, and that the washers or spacers match the assembly drawing. Missing parts must not be replaced with random hardware-store components.
The current tubus instructions require suitable mounting points on the bicycle, compatible strength specifications, and model-specific mounting hardware. They also refer to the respective tightening torques in the assembly diagram. This shows why a general value from the internet is not sufficient: the screw size, material, frame eyelet, adapter, and rack model determine the correct connection.
Check the contact points for bright, scuffed material, rust, elongated screw holes, hairline cracks, or deformed struts. Movement in a threaded insert in the frame is particularly critical. With carbon frames, damaged threads, or unclear adapter installation, stop the inspection yourself.
Not every loose screw should simply be tightened further
A screw may only be tightened using the specified tool, the correct parts, and the torque specified in the instructions for the specific bicycle and rack. Beforehand, check that the thread and screw are undamaged and that the strut is seated without tension. If a misaligned strut is forced into position by tightening, the connection may remain under preload despite the screw head being tight.

Use threadlocker, grease, or new washers only if the manufacturer or a specialist workshop specifies them for this exact connection. Strong liquid threadlocker is no substitute for an intact thread. A screw that is too long may come into contact with components inside; one that is too short may not engage sufficiently. Self-locking nuts and special screws must be replaced with suitable parts, not just any similar-looking ones.
The assembly instructions for a current tubus rack recommend checking the screw connections with a torque wrench after the first 100 kilometers and thereafter at the intervals specified there. These intervals apply to the respective product and are not a universal maintenance schedule. For your rack, follow its instructions and the bicycle manufacturer’s specifications.
Distinguish between the rack body, struts, and accessories
If all mounting points remain tight, the noise may come from the spring flap, adapter plate, rear light, mudguard, or bag. Remove detachable accessories one at a time and move the unloaded bicycle by hand. Rear-light cables must be routed securely, but must not be pulled taut, pinched, or run around a sharp edge.
A crack in the rack tube, a broken weld seam, or a permanently bent platform cannot be safely repaired with an additional clamp. tubus prohibits structural modifications to its racks and emphasizes the use of product-specific parts. With other brands, too, only the approved repair or replacement procedure should be used.
Also check the clearance from the tires, mudguard, brake caliper, and moving parts throughout the entire visible area. To do this, turn the wheel only when the bicycle is secure and your hands, clothing, and cables remain away from the spokes and chain. Scrape marks are a warning sign, even if no contact can currently be heard while stationary.
After the repair: test unloaded first
After professional installation, first check the rack without luggage. Move it slightly in all directions, check the clearance, and push the bicycle a few meters. Only then take a short ride on a flat, traffic-free surface. If play or rattling occurs again, stop the test.
Afterward, load the rack only up to the lowest limit specified for the bicycle, rack, and accessories. The load capacity stated for a rack does not automatically authorize use with a child seat, passenger transport, or trailer hitch. Such applications require explicit approval for the combination. Distribute permitted luggage evenly, keep the center of gravity and straps controllable, and do not cover any lights or reflectors.
When a workshop should take over
- The frame eyelet, threaded insert, or adapter moves along with it.
- The rack tube, weld seam, or strut is cracked or visibly deformed.
- A bolt will not engage, spins freely, or has broken off in the thread.
- The rack cannot be aligned centrally with sufficient tire clearance.
- The model or assembly instructions are missing, and it is unclear which parts go where.
- A battery, rear-light cable, brake component, or axle mount is integrated into the assembly.
If possible, bring photos of the condition before disassembly, the rack designation, and the bicycle manual. State the load, accessories, and when the wobbling first occurred. This allows the workshop to check the mounting, compatibility, and any consequential damage together.
Avoiding recurring wobbling
Before longer rides with luggage, check the mounting points, and inspect all contact points after transporting the bicycle. Remove bags and baskets before transporting the bicycle by car if the manufacturer's instructions require it. Look for new chafing marks and unusual rattling instead of waiting only for visibly loose bolts.
Do not exceed either the rack's load capacity or the bicycle's permissible total weight. A heavy bag on one side increases the varying load on the struts and mounting points. Even weight distribution and correctly secured accessories reduce movement, but do not replace regular inspections.
Frequently asked questions about a wobbly luggage rack
Can I tighten every bolt to the same torque?
No. Connections, bolt sizes, materials, and manufacturer approvals differ. Use only the values specified in the documentation for the particular installation.
Does threadlocker prevent it from coming loose again?
Only if it is intended for this connection. It will not repair damaged threads, bent struts, or incorrect mounting hardware.
Can I ride with an empty, slightly wobbly rack?
A loose component may continue to swing or get caught in the wheel. Clarify the cause before riding; if the movement cannot be remedied safely, walk the bicycle.
Does the maximum load capacity also apply to a child seat?
No. The load capacity and approval for a child seat are separate specifications. The bicycle, rack, seat, and mounting system must be explicitly compatible with one another.
Conclusion: Unload it, trace the mounting points, and follow the specifications
A wobbly bicycle luggage rack should be inspected unloaded and with the bicycle stationary. Trace the movement from the rack platform through the struts and bolts to the frame mounting points. Only retighten intact, compatible connections to the specified torque. In the event of a crack, deformation, thread damage, or unclear adapter installation, have the work done by a specialist. Only a secure, unobstructed rack may be loaded appropriately again.
As of September 6, 2026. Fasteners, tightening torques, inspection intervals, load capacity, and accessory approvals are governed by the current documentation for the bicycle and luggage rack.
Share:
Bicycle valve losing air: How to systematically find the leak
Bicycle valve losing air: How to systematically find the leak