

If a bicycle valve is losing air, the first step is to determine where the air is actually escaping. A hissing pump head, a leaking valve insert, a crack at the valve base and a tubeless leak at the rim or rim tape can appear similar. At the same time, every bicycle inner tube slowly loses pressure. Instead of immediately tightening the valve, a controlled check with a pressure gauge and a small amount of water can help.
Normal pressure loss or a genuine leak?
Schwalbe points out that even airtight bicycle inner tubes continuously lose pressure; this happens faster at higher pressures. As a guideline, the manufacturer cites up to around one bar per month for butyl tubes, while latex tubes should be checked before every ride. This is not a free pass: if the same tyre loses significantly more pressure than usual over several hours or a few days, the cause must be investigated.
Measure the pressure with the same suitable gauge, at a similar tyre temperature and after a fixed time interval. The thumb test is too inaccurate for this. Record the initial and subsequent readings. Inflate only within the permissible limits of the tyre and rim; the lower limit applies. A tyre that becomes soft while riding or suddenly loses air must not be ridden further.
Where is air escaping from the valve?
| Leak location | Observation | Safe next step |
|---|---|---|
| Valve opening or insert | Bubbles form at the top of the valve after the pump has been removed | Check the valve type and whether the insert can be replaced |
| Valve base on the inner tube | Bubbles appear at the side where the stem and inner tube are joined | Replace the inner tube; determine the cause of the pulling or misalignment |
| Pump head while pumping | Air escapes only when the pump is attached | Check compatibility, sealing and straight positioning |
| Tubeless valve at the rim | Bubbles at the valve hole, possibly also at spoke nipples | Check the valve, rim tape and rim as a system |
| Tyre or inner tube away from the valve | Pressure drops, but no bubbles are visible at the valve | Do not assume a valve fault; check the rest of the system |
The position where bubbles emerge is more important than their path to the outside. With tubeless wheels, air can travel inside the rim cavity and only become visible at a spoke hole. The visible bubble therefore does not necessarily mark the original defect.
A local leak test on the stationary bike
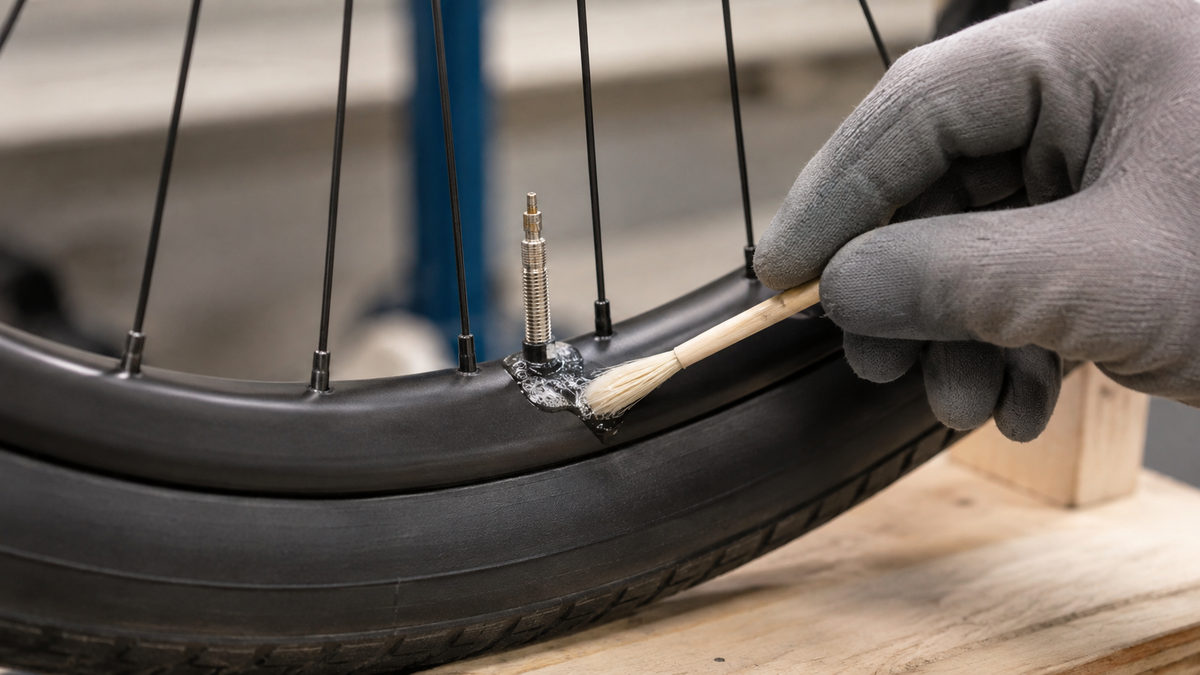
Securely position the bicycle and clean the valve and rim area with a damp cloth. Inflate it carefully to a permissible pressure. Then apply a small amount of mild soapy water with a small brush or cloth to the valve opening, core, and transition to the rim. If bubbles repeatedly form, there is an air leak there. Wipe off the solution with clean water afterward and dry the area.
Do not submerge a complete e-bike wheel, hub motor, or electrical component in water. Even with a regular wheel, local inspection is easier to identify. If a removed inner tube is tested separately under water, this should only be done after the wheel has been correctly removed and away from electrical components; anyone unfamiliar with this should take the tire to a specialist workshop.
Remove the valve cap for the inspection. It protects against dirt and damage but does not replace the sealing function of the valve system. If it is missing, a suitable cap should be installed; air loss must still be remedied at the actual valve or tire.
Do not confuse Dunlop, Presta, and Schrader valves
Dunlop, Presta, and Schrader valves are the most common types on bicycles. Their operation, pump heads, and valve cores differ. With a Presta valve, loosen the small knurled nut before pumping and close it hand-tight afterward. The thin pin can bend if the pump is attached at an angle. A Schrader valve has a spring-loaded core; the core of a classic Dunlop valve can typically be removed.

Schwalbe emphasizes that the rim hole must match the valve. A narrow Presta valve in a larger hole can place stress on the stem if no suitable solution is used. On inner tubes, the rim nut should only be tightened lightly by hand; Schwalbe expressly warns against using pliers because overtightening can damage the tube.
Not every valve core can be serviced in the same way for every product. Check the manufacturer, valve type, and tool approval before turning a valve core. A seemingly loose core can be damaged by using an unsuitable tool. If it continues to lose air after being correctly seated as specified for the model, replace the appropriate core or inner tube.
Valve stem base: Why misalignment is a warning sign
A valve stem should project straight from the rim. If it visibly leans to one side, the tire and inner tube may have shifted on the rim, or the inner tube may have been installed under tension. Schwalbe cites tension, an unsuitable rim hole, tire creep, and rim nuts tightened too tightly as possible factors in valve tear-outs.
Do not solve the problem by forcibly straightening the crooked stem. Fibers or rubber at the valve base may already be damaged. Release the air in a controlled manner and inspect the tire, inner tube, rim tape, hole, and installation. A crack at the transition between the valve and inner tube is not considered a reliable repair point; replace the inner tube and correct the cause.
When air escapes only while pumping
If it hisses only when the pump head is attached, the cause may be an incorrect pump setting, a worn head seal, a missing adapter, or attaching it at an angle. Do not press or bend the valve stem sideways to seal a leaking connection. Attach the correct head straight and lock it according to the pump instructions.
After removing it, check again with the local bubble test. If the valve then remains airtight and the measured pressure holds, the bicycle valve was not necessarily defective. A pump head that leaks in the same way on several wheels should be inspected or replaced.
Special considerations for tubeless systems
A tubeless valve seals together with the valve base, rim tape, rim, tire, and sealant. Air at the valve opening may be coming from the valve core; air at the rim hole may indicate the valve seat or rim tape. Schwalbe also states that, in the event of leaks, air can travel through the rim cavity to the spoke nipples. Therefore, do not automatically tighten only the visibly affected area.
Follow the instructions for the specific wheel and tire combination. Overtightening can deform components, while a loose fit will remain leaky. The sealant quantity, age, and valve compatibility are system-specific. A crack in the rim bed, damaged rim tape, or unclear tubeless compatibility should be inspected by a workshop. DIY attempts using adhesive on the valve base are unsuitable.
A short decision guide
- Measure the pressure with a suitable pressure gauge and note the time.
- Check the valve type, that it is seated straight, and for visible damage.
- Test the valve opening, valve core, and rim transition locally with a small amount of soapy water.
- Rule out the pump head as the cause if it only hisses while pumping.
- For inner-tube systems, assess the valve base and the rest of the inner tube separately.
- For tubeless systems, assess the valve, rim tape, rim, and sealant together.
- After every permitted measure, measure the pressure again and compare it over the same period.
When not to continue riding
- The pressure drops within a short time or noticeably while riding.
- The valve stem is crooked, torn, bent, or loose in the inner tube.
- The tire bead, rim, or rim tape appears damaged or improperly seated.
- The wheel has been hit hard or has visible cracks and deformation.
- On an e-bike, the hub motor, cable, or connector is affected.
Frequently asked questions about a leaking bicycle valve
Why does the tire lose air even though the valve cap is closed?
The cap protects against dirt, but does not fix a leak at the core, valve base, inner tube, or tubeless system. The point of air escape must be located separately.
Can I tighten the rim nut with pliers?
Not for inner tubes. Schwalbe recommends tightening by hand only and warns that using pliers can cause damage. For tubeless valves, follow the specific system instructions.
Does the entire inner tube need to be replaced if the valve is leaking?
Usually, yes, if there is a tear at the valve base. A replaceable leaking valve core can be replaced separately, depending on the valve and manufacturer. The leak must first be clearly identified.
Is it normal to have to top up the air every day in a standard butyl inner tube?
A practical butyl inner tube should not become significantly soft within a day without explanation. Measure the pressure instead of relying only on feel, and look for a leak if it drops quickly.
Conclusion: Find the point of air escape first, then take appropriate action
If the bicycle valve is losing air, distinguish normal pressure loss from a repeatable leak. Measure with the same pressure gauge, check the valve opening, core, valve base, and rim interface locally, and treat inner-tube and tubeless systems differently. Excessive force on the rim nut or stem can make the problem worse. A cracked valve base, damaged rim, or rapid pressure loss means ending the ride and having it professionally repaired.
As of September 6, 2026. Permissible pressure, valve core, rim nut, tubeless sealant, and repairs must follow the current documentation for the tire, tube, and rim.
Share:
Bicycle rack wobbling: Check the mounting securely
Bicycle rack wobbling: Check the mounting securely