

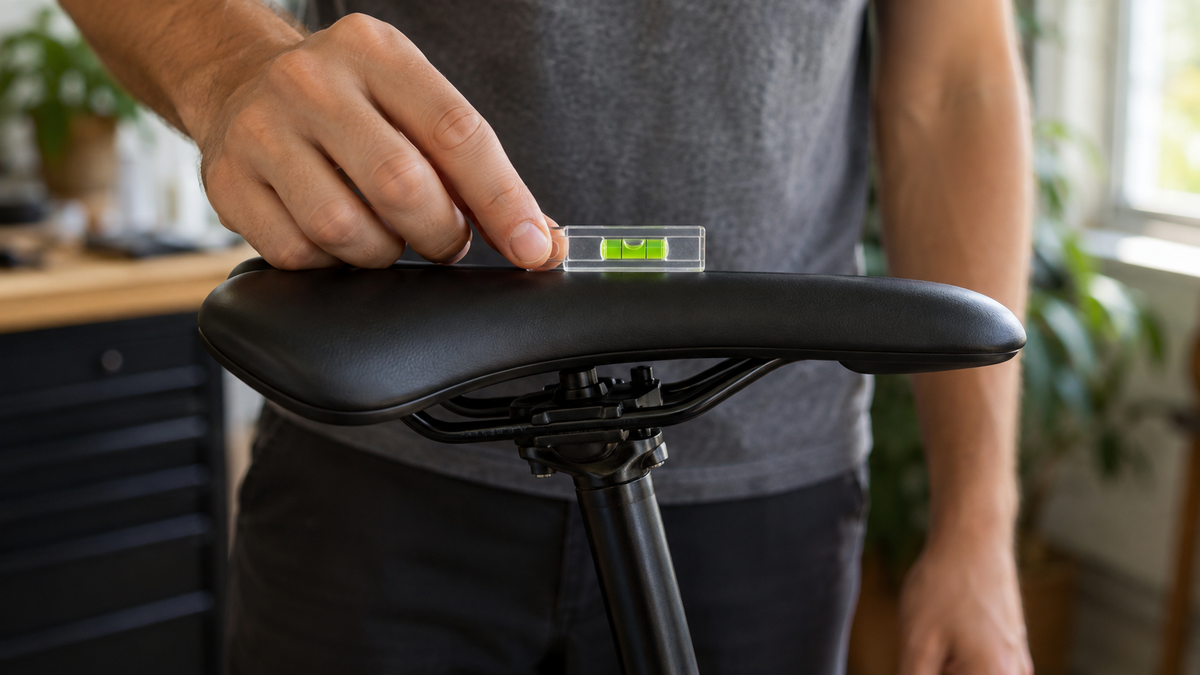
The bicycle saddle tilt can often be changed in just a few minutes, but a good setup does not come from using one fixed angle for everyone. Saddle shape, riding position, handlebar height, and individual anatomy all interact. For many saddles, a level position according to the manufacturer’s instructions is recommended as a neutral starting point. Then test only in small increments. Excessive tilting often masks another problem and can shift pressure onto the hands or seating area.
Identify the cause before adjusting the tilt
Make a note of what bothers you: Do you slide forward, support yourself heavily on the handlebars, feel localized pressure, or constantly sit in a different spot? Also observe whether the discomfort occurs immediately or only after a longer period. Tilt is just one variable. A saddle that is too high, an unsuitable width, excessive reach to the handlebars, or an unsuitable saddle model can cause similar symptoms.
Ergon describes saddle tilt as a factor affecting pelvic position and pressure distribution. The manufacturer cites a level position as the basic setting and then differentiates according to riding position and bicycle type. This is a sensible starting point, but not a medical diagnosis. Numbness, persistent pain, or one-sided discomfort are stop signals; bike fitting and, where appropriate, medical evaluation can help with recurring problems.
Measuring the reference surface correctly
A spirit level is not automatically placed from the very front tip of the saddle to the highest rear point. Some saddles are curved, have a lowered nose, or feature a stepped design. Therefore, check the user manual: it may specify a defined measuring surface or reference line. With heavily contoured models, a blanket “zero degrees” setting is ambiguous without this information.
Place the bike on level ground and hold it upright. A repair stand can distort the measurement if the bike hangs at an angle. Place a short, straight bar across the saddle only if this matches the intended reference surface. A digital spirit level or phone app can document changes; it does not replace a mechanical check.
Identify the clamp before loosening it
| Clamp type | Typical behavior | What should you pay attention to? |
|---|---|---|
| One-bolt head | The angle and clamp may loosen together | Hold the saddle while loosening it; engage the teeth correctly |
| Two-bolt head | The front and rear bolts control the angle together | Work gradually and evenly |
| Side clamping | Manufacturer-specific plates or axles | Use only the original instructions |
| Carbon rails or non-standard shape | Special dimensions and clamp components may apply | Check compatibility and torque explicitly |
Photograph the clamp from both sides and mark the current position with removable tape. Check the permitted torque on the seatpost or in the instructions. If this information is missing, do not guess. Ergon explicitly refers to the instructions for the respective saddle in its FAQ.
Adjust in small steps
- Park the bike securely and remove any luggage from the saddle.
- Mark the longitudinal position on the rails so that only the angle is changed.
- Loosen the clamp only as much as required by the system.
- Place the saddle in the neutral starting position specified in the instructions.
- Then change the nose angle only minimally in the desired direction.
- Keep the rails within all marked clamping limits.
- Tighten the bolts in the specified sequence and to the prescribed torque.
- Check that the saddle and clamp plates are fully and symmetrically seated.
With a two-bolt clamp, one bolt is not tightened fully while the other is left loose. Both form a system. The exact balance and tightening sequence are specified in the seatpost instructions. Avoid misalignment, additional washers, or lubricant on clamp surfaces not approved for this purpose.

Nose down: Don’t fight sliding forward
A slightly lowered nose can reduce pressure in the front seating area when riding in a more forward-leaning position. If it is lowered too far, the pelvis slides forward. The hands and arms then have to continuously support the body on the handlebars. Increased hand strain, tense shoulders, or frequently pushing yourself back onto the saddle are signs that you should undo the adjustment.
For e-bike fitting, Ergon describes a level position as the baseline and allows a slight deviation depending on the riding position. The key word is slight. Do not immediately set several degrees or a clearly visible slope just because a single ride was uncomfortable. Return to the documented starting value if the ride feel worsens.
Nose upward: beware of localized pressure
With a very upright riding position, a manufacturer may specify a slightly different alignment. However, a significantly raised nose can increase pressure in the front seating area and push the pelvis backward. If numbness or pain occurs, end the ride. Continuing to ride in order to “get used to it” is not a sensible adjustment strategy.
In this case, also check whether you are sitting on the intended wide part of the saddle. A saddle clamped too far back, an incorrect saddle height, or a model unsuitable for your riding position cannot be reliably corrected by tilting the saddle upward.
Change only one variable per test
Do not change the tilt, height, fore-aft position, and handlebar at the same time. Otherwise, it will remain unclear which adjustment is having an effect. After a small change, ride a familiar route with little traffic while wearing normal clothing and using your usual cadence. A short incline, a flat section, and a few braking maneuvers are enough for an initial impression. A longer assessment requires several comparable rides.
Record the angle or measurement method, distance, duration, and how it feels. Observe pressure distribution, slipping, hand strain, and pelvic stability. A new setting must not impair control when starting, steering, or braking.
Mechanical check after adjustment
Hold the saddle at the front and rear and, while stationary, carefully apply upward, downward, and lateral pressure. It must not tilt, creak, or move along the rails. Check the clamp plates: They must sit correctly and must not rest on an edge. The rails must not show any cracks, notches, severe pressure marks, or deformation.
Check the clamping again after the break-in or inspection period specified in the instructions. If the saddle becomes loose despite the correct torque, do not simply tighten it more and more. Wear, incorrect clamping parts, or incompatible rails require professional inspection.
Avoid these mistakes
- Adopting a universal angle from the internet without considering the saddle shape.
- Clamp beyond the marked limits of the saddle rails.
- Over-tighten bolts “by feel” without a torque specification.
- Start a test ride with a loose saddle.
- Combine carbon rails with clamping parts for round metal rails.
- Compensate for pain exclusively with a steeper tilt.
- Continue using it after a crash, crack or bent rail.
When bike fitting or a workshop is advisable
A professional workshop should handle the job if the clamping method or torque is unknown, the saddle does not stay in place, or carbon and specialty components are involved. Bike fitting helps when tilt, height, setback and handlebar position affect one another, or when discomfort recurs on multiple bikes. If you experience numbness, persistent or severe pain, medical evaluation is also advisable.
Frequently asked questions about saddle tilt
Does a bicycle saddle always have to be perfectly level?
For many models, level is a good starting point. Saddle shape, bicycle type and the manufacturer’s instructions may specify a different defined reference line or a slight deviation.
Why do I slide forward?
The nose may be lowered too far. Saddle height, reach and saddle shape also play a role. Return to the documented starting point and change only one variable.
How tight should I tighten the bolt?
Only use the torque and tightening sequence specified in the relevant seatpost and saddle instructions. Design, bolt size and materials vary.
Can a different tilt help with numbness?
A small adjustment can change pressure distribution, but it is not a reliable diagnosis. If numbness recurs, stop riding and have the fit and your health professionally assessed.
Conclusion: Start neutral, make minimal changes
To adjust bicycle saddle tilt, you do not need a steep angle, but a reproducible starting point. Use the manufacturer’s defined measuring surface, stay within the rail markings and tighten the clamp exactly as instructed. Test small changes one at a time. If the saddle shifts, components are damaged or discomfort persists, consult a bike workshop, bike-fitting specialist or medical professional.
As of: September 6, 2026. The contact surface, clamping limits, torque and permitted rail shape are based on the current saddle and seatpost instructions.

Share:
E-bike software update: Prepare safely and avoid errors
Raise the handlebars: safely distinguish between quill and Ahead stems