

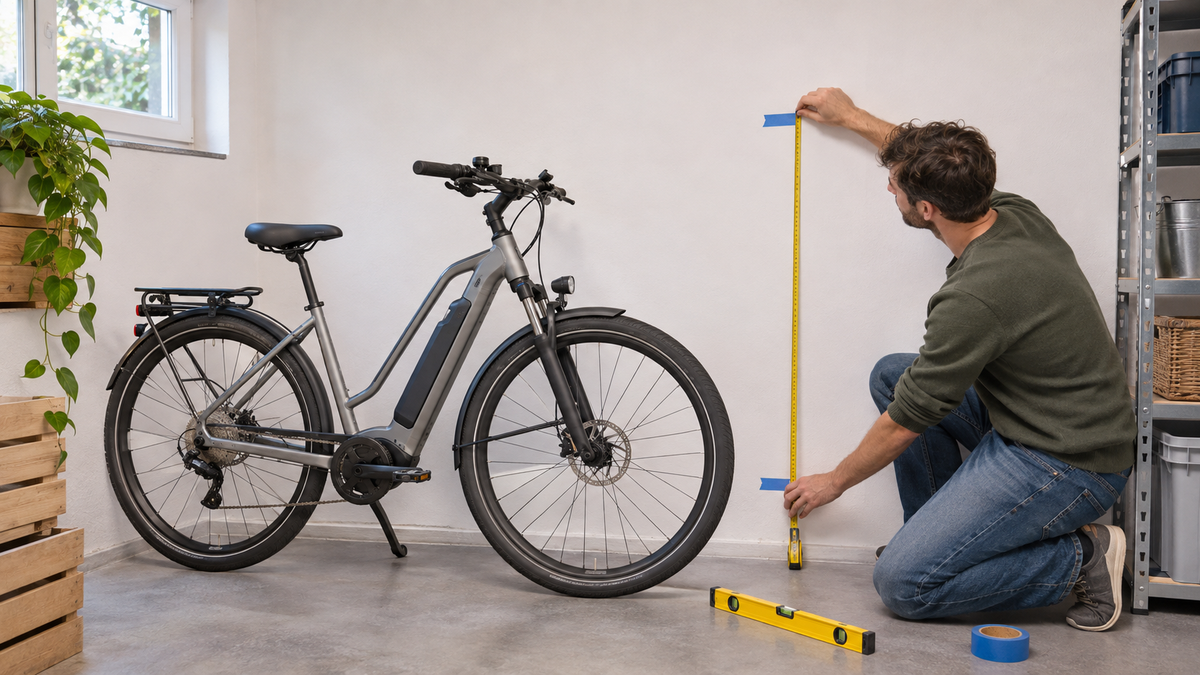
A bike wall mount saves floor space, but is only a good fit if the bike’s weight, tires or frame, wall construction and daily handling all work together. This is especially true for a heavy e-bike: it’s not enough to look at a product photo or a high weight rating. The stated load limit applies to the specific mounting system under the specified installation conditions - not automatically to every wall, wall plug and bike.
So before buying, first weigh and measure the bike, then check the wall, and only after that choose between vertical, horizontal or floor-supported storage. This helps you avoid a mount that can be installed, but is too high, too cramped or unsuitable for your bike in everyday use.
Choosing a bike wall mount: the short answer
Four checks are enough to make your choice: the actual weight of the bike, the contact point on the bike, the clearance needed for movement and a load-bearing mounting surface. A vertical holder on the front wheel uses little wall width, but requires you to be able to lift the bike. Horizontal arms spread the bike out across the wall and must suit the frame shape. A tire clip such as the Hornit CLUG stabilizes the bike together with the floor and is not a freestanding suspension system.
- Weight: Weigh the bike in ride-ready condition, including permanently attached accessories.
- Contact: Check whether the tires, rims, frame or saddle will bear the load.
- Space: Allow for handlebar width, pedal position, wheelbase and doorways.
- Wall: Check the material, structural substrate, wiring and suitable fasteners.
If any of these points are unclear, a floor stand is usually the simpler temporary solution. Only start drilling once the holder and fasteners have been approved for the specific wall surface.
Vertical, horizontal or floor-supported?
The design determines how much effort is needed to store and remove the bike, and where it is held. The following overview is a selection guide, not an approval for any particular model.
| Design | Typical contact point | Advantage | Check before buying |
|---|---|---|---|
| Vertical bike rack | Front wheel or rim | Requires little wall width | Tire width, rim height, total weight and safe lifting height |
| Swiveling bike rack | Front wheel, with additional rear-wheel guidance | Bike can be swung sideways against the wall | Swinging clearance for handlebars, pedals and crank |
| Horizontal support arms | Top tube or suitable frame areas | Less lifting, keeps the bike neatly arranged against the wall | Frame geometry, contact points, handlebar width and wall clearance |
| Tire clip with ground contact | Tire; wheel remains on the ground | Not fully lifted off the ground | Actual tire width, orientation and permitted wall construction |
With carbon frames, delicate paintwork, fenders or unusual frame shapes, a blanket recommendation is especially risky. What matters is whether the bike and rack manufacturers allow the specific type of contact. A soft coating protects against scratches, but does not make an unsuitable shape compatible.
How to read manufacturer specifications correctly
Load ratings are product-specific. For example, the Topeak Swing-Up EX Holder is rated for a maximum of 16 kg; Topeak also specifies a maximum combined tire and wheel height of 8 cm and a tire width of 6.6 cm. These values apply to this model only. They say nothing about other Topeak holders or about a wall that has not been prepared according to the instructions.
The Feedback Sports Velo Wall Rack 2D lists a maximum load of 22.7 kg and requires installation on a standard wall stud. The manufacturer also notes that very wide handlebars, long wheelbases or fat bikes may not be suitable. The Park Tool 451-2 lists a load of 52 kg for the hook, but only when securely fastened into a solid material with sufficient load-bearing capacity; suitability of the mounting location is explicitly the user’s responsibility.
These examples cannot be compared using the rule “the highest number wins.” A hook, frame arm and swivel wheel holder transfer forces differently. Screw spacing, leverage, wall material and movement while hanging the bike also affect the load. So only buy based on the complete, current instructions, not on a single weight figure in a shop filter.
Measure the bike and available space in full
Weigh the bike in the configuration in which it will normally be hung. Remove the lock, basket, child seat, full bags and other loose loads before hanging it. On an e-bike, removing a detachable battery can make lifting easier, but only if the manufacturer’s instructions allow it and the battery is stored safely afterward. The remaining weight of the bike must still be within the approved limit.
Then measure not only the tire width or top tube. The widest point of the handlebars, wheelbase, overall height, pedal clearance from the wall, and the space needed to turn or swing the bike are also relevant. Use masking tape to mark the bike’s outline on the wall and floor. Open doors, cabinets, and basement storage units fully, and check whether the handlebars or pedals extend into the walkway.
For tire clips, the actual tire width matters more than the number on the tire sidewall. Hornit divides the CLUG by actual tire width into several sizes. The manufacturer also explicitly states that the CLUG works together with the floor and is not intended to support the bike freely in the air. This principle should not be confused with a load-bearing wall hook.
Check the wall, fasteners, and mounting height
A load-bearing mount is only as reliable as its mounting surface. Concrete, solid brick, perforated brick, timber studs, and plasterboard all require different fasteners. A universal wall plug included with the mount is not automatically suitable for every wall. If the wall construction is unknown, there is an external thermal insulation composite system, a cavity wall, or old, crumbly building material, have a professional choose the fasteners.
Before drilling, make sure there are no hidden electrical, water, or gas lines. In its instructions for the Swing-Up EX, Topeak explicitly warns against unsuitable, unsupported wall surfaces and hidden lines. Even on a suitable surface, inspect the mount after installation and regularly check for loose screws, deformation, or damaged protective pads.
Choose the height based not on the empty space, but on the person who will hang the bike there every day. Do not attempt a risky lifting test with a similarly heavy object unless it is held securely. Instead, mark the bike’s position, hold the bike in front of it with a second person, and check the grip height and range of motion. If you can only hang the bike with your back twisted or above shoulder height, you need a lower or floor-supported solution.
What matters most for heavy e-bikes
Many simple wall mounts are designed for lightweight everyday or road bikes. A heavy e-bike can reach or exceed the stated limit. In addition, hanging it abruptly creates a dynamic load that a static weight rating does not account for. So leave a safety margin and position the bike carefully instead of letting it drop onto the hook.
A ceiling hoist can change how you lift the bike, but it is a separate product category. The FISCHER Bike Lift PLUS, for example, specifies a total weight of 30 kg and a ceiling height of up to 4 m. Here too, the rating and fastening apply only to this product and its intended ceiling installation. A ceiling hoist is no reason to use the same hooks or wall plugs on a wall.
If the weight, lifting height, or surface are not a safe match, a sturdy floor stand or low support bracket is often more practical for everyday use. Saving space is no advantage if the bike later gets in the way because it is awkward to handle.
Frequently asked questions about bicycle wall mounts
Can a bicycle be hung by its front wheel?
Only if the bicycle and mount manufacturers approve this type of contact for the specific combination. Check the tire, rim, fender, and system geometry. There is no general approval that applies to every wheel.
Can I screw a wall mount directly into drywall?
Not unless the fastening system is designed for it. Some instructions explicitly require a load-bearing support or prohibit unsupported panels. The wall construction and load must be assessed together by a qualified professional.
Is the highest load capacity automatically the best choice?
No. Tire or frame compatibility, mounting surface, operating height, and clearance are just as important. A product’s load rating cannot be applied to another system.
Can I leave the lock on the bike?
Remove loose or heavy accessories before hanging the bike. They add weight, can swing, and make controlled handling more difficult. Permanently attached accessories should be included in the weight check.
Conclusion: measure first, then drill
Choosing the right bicycle wall mount starts not with design, but with weight, contact point, wall, and handling. Today, note the bike’s actual weight, tire or frame dimensions, handlebar width, and wall construction. Then choose a type of mount, read the complete manufacturer’s instructions, and check the fastening method. Mark the installation position and drill only when all four factors are compatible.
As of November 3, 2026. Product specifications are examples from the respective linked manufacturer pages and do not constitute general approval of load capacity or installation.
Share:
Bicycle First Aid Kit: Essentials for Everyday Use and Cycling Trips
Replacing an e-bike charger: Check compatibility before buying