

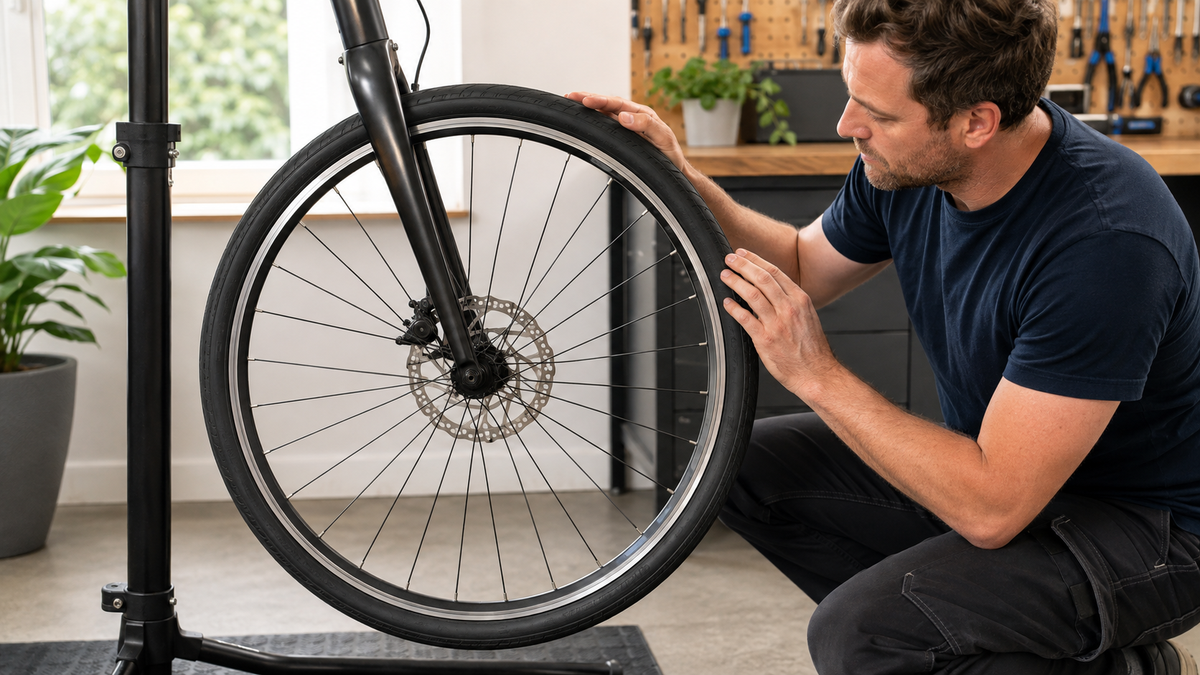
A bicycle tire is not seated correctly if its bead does not lie evenly in the rim. Typical signs include an uneven indicator line on the tire sidewall, a visible bulge, or radial runout immediately after installation or tube replacement. This must be distinguished from worn tread and normal tire wear. Before inflating further or riding, release the pressure in a controlled manner and check the tire, rim, tube, and approved size.
Do not ride with a bulge or severe radial runout
A bead that is locally protruding can come completely off the rim as the pressure continues to rise. Stop immediately if the tire grows unusually while inflating, the indicator line disappears, or the tube becomes visible between the tire and rim. Keep your face and hands away from the affected area. Release air through the valve without manipulating the pressurized tire sideways.
If you first notice the damage while riding, brake calmly and avoid sharp steering movements. Push the bicycle after stopping. On an e-bike, switch off the system. Running the motor on a work stand is not a suitable test because a poorly seated tire can suddenly come off and accelerate the wheel.
Distinguish bead seating, tire damage, and rim problems
| Observation | Possible cause | Decision |
|---|---|---|
| The indicator line is closer to the rim at only one point | The tire bead is still sitting too deep there | Release the pressure and realign the installation |
| The tube is visible beneath the bead | Tube pinched | Do not inflate; reinstall the tire and check the tube |
| The bead or casing shows a crack, exposed wire, or deformation | Tire damaged | Do not continue using it; have it professionally replaced |
| The rim flange is deformed or cracked | Rim damage | Do not install or ride |
| The indicator line is even, but the tire still runs laterally | The casing, rim, or wheel may be affected | Do not “center” it by using higher pressure; have it inspected by a workshop |
Clarify the size and system before installation
The tire and rim must be compatible. Compare the ETRTO specification on the tire with the intended rim size and the approvals issued by the bicycle or rim manufacturer. The article How to read bicycle tire sizes and ETRTO explains why inch designations alone can be misleading. Similar names or the same outside diameter do not guarantee a compatible bead.
Also determine whether you have a tube system or a combination explicitly suitable for tubeless use. The tire bead, rim profile, rim tape, valve, and permitted installation method differ. A tubeless tire cannot automatically be used without a tube on every rim. If there is no clear approval, do not improvise a mixed combination.
Fully deflate before reseating
Open the valve and gently press to check whether the tire is soft all the way around. Only then release the bead from the rim flange and push it into the deeper rim well. Do not use screwdrivers or sharp-edged metal levers. Schwalbe warns against damaging the tube with tire levers during installation; suitable smooth tire levers should be used only in a controlled manner.
Remove the tire if the tube, rim tape, or bead cannot be seen all the way around. Check for pinch points, cuts, foreign objects, and a twisted tube. The rim tape must fit the rim, cover all intended openings, and must not slip or be damaged. Continental explicitly identifies the condition and correct positioning of the rim tape as part of the installation check.

Install the tube and tire correctly
With a tube system, inflate the intact, compatible tube only enough for it to hold its round shape. Insert it without twisting. Fit the tire bead into the rim in sections, paying particular attention opposite the valve to ensure it remains in the deeper rim well. The tube must not be trapped under the bead at the valve; the valve stem should be straight after installation.
Go all the way around both sides of the tire and gently push the tire toward the center to check for a pinched tube. Only when no tube is visible anywhere and the bead appears undamaged should you increase the pressure in small increments. Follow the installation instructions for the specific combination. Use lubricant, dish soap, or mounting fluid only if the manufacturer approves it for exactly this purpose.
Compare the circumferential control line
Many tires have a continuous fine molding or control line near the rim. Schwalbe and Continental recommend comparing its distance from the rim edge on both sides around the entire circumference. Slowly rotate the wheel by hand. The line should run evenly; it must not disappear beneath the rim flange or protrude noticeably farther at any point.
Inflate only in stages and stand to the side of the wheel. Never exceed the permitted range of the tire or rim; if both specify different limits, the stricter requirement applies. There is no general “seating pressure.” Schwalbe also points out for riding pressure that tire width, load, and rim must be taken into account. More pressure is therefore no substitute for proper installation.
If the tire remains uneven despite reseating
Let the air out again and recheck whether the bead can move freely in the rim bed. Rim tape that is too wide, displaced, or damaged can obstruct seating. An ill-fitting inner tube, an unfavorable position at the valve, or tight manufacturing tolerances may also be possible causes. Repeatedly inflating to the upper limit is not a diagnosis.
If the control line remains uneven, do not continue with a compressor, blows, or untested chemicals. The tire and rim must then be checked for compatibility and damage. Schwalbe explains that the dimensional tolerances of tires and rims can combine unfavorably. However, this does not justify exceeding the component limits; a specialist workshop can assess the combination.
Tubeless requires its own procedure
In tubeless systems, rim tape, valve, sealant, bead shape, and rim approval are safety-relevant. Follow the joint approval of the tire and rim as well as their installation instructions. With some combinations, a strong burst of air may be part of professional seating, but incorrect installation increases the risk of the tire popping off abruptly. Without experience and suitable equipment, a persistent case belongs in a workshop.
After a loss of pressure, do not look only for a leak. Recheck the entire bead line. Sealant can close a small hole, but it cannot repair an incompatible or damaged fit. Visible threads, damaged bead cores, or a deformed rim rule out further use.
Final inspection before the first ride
- Check the guide line on both sides around the entire circumference.
- Confirm that the valve is straight and that the tire and rim edge are undamaged.
- Turn the wheel by hand and check for radial or lateral runout.
- Check the brakes, axle fastening, and clearance from the frame and mudguard.
- After a short, slow test ride, check the seating and pressure again.
Only take a test ride if there is no bulge, no pinched inner tube, and no visibly damaged component. Choose a traffic-free, level surface and ride without high speed or sharp turns. If the tire shifts again, stop immediately.
Frequently asked questions about incorrect tire seating
Why does a new bicycle tire wobble?
An unevenly seated bead is one possibility. The casing, rim, or wheel may also be affected. First compare the guide line; adding more air on suspicion is not a solution.
Can I inflate it to the maximum pressure so that the tire snaps into place?
You must not exceed the limit of the tire or rim. If the bead remains uneven despite installation according to the regulations, have the combination inspected.
How can I tell if an inner tube is pinched?
Before inflating, no inner tube should be visible or palpable anywhere between the bead and the rim. If you suspect a problem, release all the air and reinstall the tire.
Is a slight radial runout normal?
Minor manufacturing deviations are possible, but a disappearing guide line, bulge, or obvious change is unacceptable. When in doubt, let a specialist decide.
Conclusion: even seating before riding pressure
If the bicycle tire is not seated correctly on the rim, release the pressure and distinguish installation errors from tire or rim damage. Check the ETRTO and system approval, rim tape, inner tube position, valve, and both bead lines. Then inflate only gradually within the limits of all components. If the seating remains uneven or any material is damaged, do not continue experimenting; have it professionally inspected.
As of September 6, 2026. Tire, rim, inner tube, and tubeless compatibility, as well as permitted pressure, are governed by the specifications of the specific component manufacturers.
Share:
Loose bicycle crank: assess the play and prevent damage
E-bike display won’t turn on: Check the external power supply